
One of the drawbacks of SAP that I have ran into is due to the numerous amount of clients you can create across multiple systems. This can result in users having multiple accounts for you to manage. Thankfully, there is a solution to this. Enter Central User Administration, aka CUA.
The necessary steps required to implement CUA are, fortunately, not very difficult assuming you have proper authorizations to the systems.
I. Specify Logical Systems
1. Log into the SAP client that will be the Central System.
2. Run transaction BD54.
3. Create new Logical System names for every client that will be part of CUA (Central and all Children) using the following naming convention:
[System ID]CLNT[Client]
Example: ITDCLNT100
4. In each Child System, add a Logical System name for the Central System using the method specified above.
II. Assign Logical Systems to Client
For each client that will be part of CUA, perform the following steps:
1. Run transaction SCC4
2. Switch to Change mode
3. Double-click on the client for Details
4. Specify the Logical System name
III. Create System Users
A.) In the Central System, create the following user:
UserID: CUA_[System ID]
Roles Assigned:
- SAP_BC_USR_CUA_SETUP_CENTRAL
- SAP_BC_USR_CUA_CENTRAL
- SAP_BC_USR_CUA_CENTRAL_BDIST
B.) In each Child System, create the following user:
UserID: CUA_[System ID]_[Client]
Roles Assigned:
- SAP_BC_USR_CUA_SETUP_CLIENT
- SAP_BC_USR_CUA_CLIENT
IV. Create RFC Destinations
1. Log into the Central System.
2. Run transaction SM59.
3. For each Child System, create a new RFC Connection with settings similar to the following:
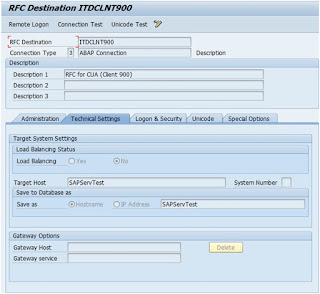
4. Ensure that the User under Logon & Security is the account you create in Step III-A for the Child System.
5. In each Child System, create an RFC Connection back to the Central System.
V. Create CUA
1. Log into the Central System.
2. Run transaction SCUA.
3. Enter the name of your distribution model, such as “CUA.”
4. Choose Create.
5. Enter the name of the Child Systems.
6. Save.
VI. Synchronization of Company Addresses
1. Log into the Central System.
2. Run transaction SCUG.
3. Right-click on the first Child System and choose to Synchronize Company Addresses, repeat for each Child System.
4. From the main screen of SCUG, click the Company Addresses button to distribute them to target systems.
VII. Transfer Users
1. Log into the Central System.
2. Run transaction SCUG.
3. Right-click on the Central System and choose to Transfer Users.
4. Select all New and Changed users and choose Transfer Users.
5. Repeat for each Child System.
VIII. Create Partner Profile for Logical System
For each Child System, perform the following steps:
1. Run transaction WE20.
2. Create a new Partner Profile under the Logical System (LS) category with settings similar to the following:
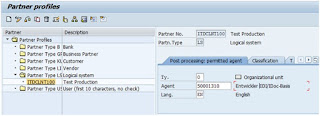
3. Define the following Inbound Parameters:
Message Type: USERCLONE
Process Code: BAPP
Once you have all of these steps complete, you should be able to perform all user administration from your Central System. Within transaction SU01 you will have a new tab called Systems which will allow you to give a user access to any system within CUA. You will also be able to assign Roles per system. For example, a user could have SAP_ALL within your Development system and Display Only within your Production system, all managed through your Central System. No more logging into each individual system for user administration.


0 comments:
Post a Comment